Cleanliness is Next to...
(The War on Friction)
The combination of tarnish, oxidation, residue from previous lubrication and other organic matter (slide cheese) combine to create friction between the tubes. Here is a phone call I receive quite often:
Caller: I got this new slide and it was great. I haven’t dented it or stood it up on the slide or anything, but it keeps getting slower and slower. What is wrong with this slide?
The Slide Dr.: Let me guess. You are using product xyz to lubricate the slide.
Caller: How did you know?
Slide Dr.: The explanation is easy. With product xyz, only a tiny amount of each of the chemicals is required. After a bit more dialog, we discovered the player was using 10 to 20 times the required amount of the product and not wiping any of the product out of the outer tubes before adding more product.
Look at your slide tubes:
The inside of a brass outer tube should be a bright shining brass color. You should see no black streaks or chalky dull surfaces on the inside of the tubes.
Nickel silver outer tubes quite often sound scratchy unless heavily lubricated, which in turn slows the function of the slide. Nickel oxide is the culprit here. When properly cleaned and polished, there should be no scratchy sound and no restrictions on the inside of the outer tubes.
Nickel/chrome inside tubes should sparkle and you should see thousands of tiny water droplets as you would observe on a freshly waxed car.
Correcting these lubrication and contaminant problems has become a simple and virtually “goof-proof” process. There are several products, which will remove these from the inside of the outer slide tubes.
Instructional Videos are available on the Resources Page.
Water based brass polish, such as Wright’s Brass Polish will work wonders. Wrap a soft cloth (old bed sheet or muslin, 20 cm by the length of the sheet) around the complete length of the cleaning rod. Be sure to hold the tube that you are cleaning and be sure that the cloth fits snugly but not so tight as to require any force to move it in the tube. Place a tablespoon of polish on the front end of the rag and polish the inside of each outer tube. It is important that you repeat the process, flushing the residue out of the tube with water between applications, until the water comes out looking the color of milk. Wipe the inside of the tube with a clean cloth.
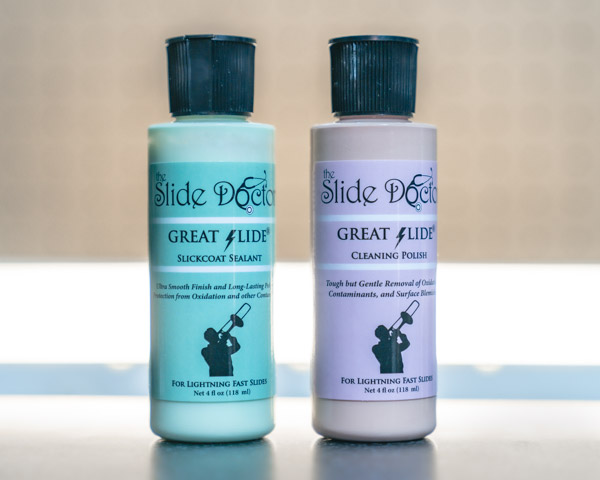
There are several products that will seal the inside of the outer tubes. We have tried a great variety of products looking for the best combination of results and have found a specially formulated blend of non-Teflon based polymers, Great Slide. This is the product we use to complete the setup of all slides here in the Dr.’s Office.

The product is simple to use. Directions come with the product.
The first step requires the use of Great Slide Cleaning Polish which will remove any residue left from the brass polish. You may be quite surprise to see how much black residue you’ll remove even after using the brass polish. The final step is to coat the inside of the outer tubes with Great Slide Slickcoat Sealant and buff with a clean cloth. You will need to clean the slide several times afterwards for the first few days, or until all of the black residue is out, and the cloth comes out of the outer tubes with no black showing.
From this point on, there are several products that work very well to lubricate the slide. The important part is to understand that MOST players use TOO MUCH lubrication, thinking, “If a little is good, more must be better!”
If you are using Superslick and Plus Oil, place just a tiny smidge on the end of your finger and rub the one smidge on both stockings. Then introduce the inner slide into the outer slide and transfer the cream to the inside of the outer tubes. When you move the slide, it should not feel slow. If it does, you probably used too much cream. After the transfer, remove the inner slide and wipe all of the cream off of the inner tubes. Apply one dime-sized drop of Plus oil to each inner tube and rub all over the tube. Spray with water, reassemble the slide and enjoy! It may require several applications of lubrication and cleaning to remove any remaining residue from the Great Slide treatment. When a cleaning cloth comes out without any black on it, you have completed the process.
If you are using Slide-O-Mix, only one drop of each product is required on each tube. Place one drop of the first bottle on each tube and transfer the product to the inside of the outer tubes. Wipe the inner slide clean. Apply one drop of the second bottle to each stocking, rub over the entire inside tube and spray with water. Reassemble and enjoy.
Several players have mentioned that the cleaning process takes too much time away from their practice. Contaminants can slow the action of the slide. Removing contaminants will improve the action of the slide. If we can improve the speed of your slide, not only can you can improve your ability to play faster, but to play smoother and more controlled. If the action feels lighter, you don’t work as hard to play and suffer from less fatigue. The first time you do lip trills that require a slide position change, you’ll see immediately why this process is so important why you cannot afford to be without it.
Remember that technical assistance is always available from the Slide Dr., and opinions are based upon over 30 years of working with thousands of slides.
Testimonials
What People are Saying
“Highly Recommend”
"As a touring musician... I've had my slide aligned by some of the best technicians in the country... I would HIGHLY recommend the Slide Dr.'s services!"
Megan O
“Brilliant”
"Slide Dr. work is brilliant. I went to him a few years ago and will always continue to bring my slides. Very fair pricing and superior customer service makes the Slide Dr. stand above with his work."
Jordon S
“Absolute Magician”
"This man is an absolute magician. I destroyed my slide at a football game and took it to the Slide Dr the next morning. He fixed it better than it was new in no longer than two hours... Every trombone player should have the Slide Dr check out his/her slide. Absolutely recommended!"
Luis R
“Fantastic job”
"My slide was in terrible shape. It was slow and out of alignment. I sent my slide to the Dr. and it is a different slide. They did a fantastic job. I would definitely recommend them."
Jay W
Have a question?
Let's talk slides!

